My router suffers from amnesia Link to heading
Of course I have a home server.
Like probably most people who read this blog (if there are any of you out there!), I like to self-host some services. Think my own git repositories for projects, plus movies, ebooks, and even personal budget tools. Well, that list isn’t really the important part. What I’m getting at is that everyone who also has a home server knows what a sweet setup it can be!
Having all of this accessible within your LAN is awesome, but the really cool part? That’s when you set it up to be accessible from anywhere. And that’s the big advantage and the whole point of self-hosting: using your own services from anywhere, anytime.
This obviously poses the question: how do I access my home services from afar? Now, this isn’t a post on how to create your home server, but one crucial step will always be enabling port-forwarding in your home router.
Some folks choose to set up multiple port-forwarding rules, basically making various services directly accessible. I, however, opted against that – it just cranks up my server’s surface exposure to attacks, and frankly, who needs that stress? The most secure solution I found? Just forwarding one port and using it to establish a connection with a VPN server in your home network (or a VPN peer, if you’re using Wireguard, which is totally what I do!). This trick not only ensures I’ve got just one tiny port open to the outside world, but also that only encrypted traffic gets to boogie on through.
But that is where my problem starts. My setup is perfect, but my router is from my ISP, and for some annoying reason, from time to time, it just resets automatically. And when it does, it erases all of my port-forwarding rules. So you can imagine how annoying it is when I’m trying to access my home server while I’m at work or school, and my VPN just won’t connect. It’s been going on for some time now, and it’s one of the reasons I’m not able to take advantage of even more services, like hosting my own password manager. Why? Because I don’t want to take the chance of not being home, needing to log in somewhere, and just not being able to retrieve my credentials. Like I said, such a trivial issue with such critical consequences… annoying consequences.
Exploring my options Link to heading
You can probably figure out by now that this little annoyance was the problem I set out to resolve in this post. How could I make this system more resilient, without, you know, throwing my router out the window?
The first question I had was the obvious one: why does the router do this?
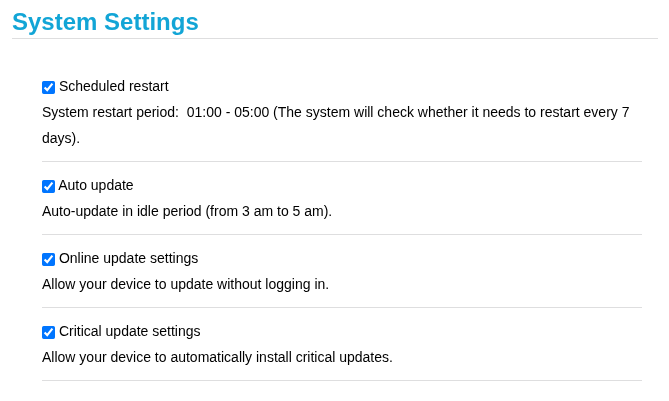
From the admin panel of my router, I found this delightful set of options. It’s pretty obvious that the problematic one is the “scheduled restart,” but what I still don’t get is why it erases some configurations but not others. For that, I’m afraid, I still don’t have an answer. The mystery continues!
Naturally, I turned it off, fully expecting it to just solve the issue. But for some reason, after a few days, I went back to check, and guess what? The configurations were gone again. My blood is boiling by now because I only ever find out the configurations are gone when I’m miles away from home and I REALLY need to connect and I just can’t.
But I insisted, and I can’t tell you how many variations of these options I’ve tried – enabling/disabling some or all, tweaking every setting – but the problem just stubbornly continued! Seriously, why is my router erasing my configurations?! It’s like it has a personal vendetta against my self-hosting dreams.
That was it. I had enough. It was clear I would have to come up with my own solution, because clearly, my router was not on my side.
More interesting than I imagined Link to heading
So, I didn’t really know how to do it, I just knew that I had to find a way of interacting with the router programmatically. In these cases, I tend to just go for the worst-case scenario, thinking I’ll have to scrape the admin page, figure out how to interact with it, and really over-engineer the crap out of it!
Luckily, this time I was smarter than usual. The first thing I did, like any good reconnaissance operative, I opened OWASP ZAP for proxying and then opened up the page on my browser, just so I could see what would happen when I logged into the admin panel.
And then, the most wonderful thing happened. To my surprise, without interacting with the page at all, a few api/ endpoints started showing up…
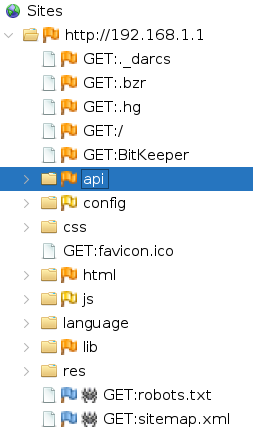
Could it be? Could it be that this unassuming, crappy-looking piece of ISP junk has a few tricks up its sleeve in the form of a REST API I didn’t know about? Would this turn out to be easier and even more awesome than I anticipated?

Well then, if this is to be true, the first step was to figure out what requests were involved for authentication. For this, I just authenticated manually and captured the following POST requests.

This is quite interesting, we get two requests:
/api/user/challenge_login/api/user/authentication_login
Just from the names, we can deduce it’s some sort of CHAP authentication procedure. Let’s examine the first request more carefully.
POST http://192.168.1.1/api/user/challenge_login HTTP/1.1
...
<?xml version="1.0" encoding="UTF-8"?><request><username>admin</username><firstnonce>45adf3a2cce832f3486a908c35490b90be709348a9d775214d7bdfc04d971d53</firstnonce><mode>1</mode></request>
HTTP/1.1 200 OK
...
<?xml version="1.0" encoding="UTF-8"?><response><iterations>100</iterations><servernonce>45adf3a2cce832f3486a908c35490b90be709348a9d775214d7bdfc04d971d5326Q5vDwFdWk2arNgZxLlwSpPce06Kgmu</servernonce><modeselected>1</modeselected><salt>f76f8f886c80b03f1f7aef5e466b55cfd1894501283683178ea94f09548c8439</salt><newType>0</newType></response>
Yeah, it really is CHAP! I see nonces, iterations, I see salt… I don’t see pepper, but this is hot!
What I also see are non-standard header fields: _ResponseSource set as Broswer (I guess English wasn’t the strong suit of the developer, bless their heart) and __RequestVerificationToken with some weird value I have no idea where it came from. Finally, the Cookie is also populated with some value.
POST http://192.168.1.1/api/user/challenge_login HTTP/1.1
...
_ResponseSource: Broswer
__RequestVerificationToken: ZL1Yz7kWugYZJfopEQvXINI2DRayNWXm
...
SessionID=q6jtjN8RYr6w3vLeFVWjxru0KTMbLH90T0wXoAgmtzphl45NYbIm8MsU9flb518ycQrs9xy08Jn7LUmHVeoLPMHofjoawFldnNLVeje80fjXVB2qKnh38QOdBwDQ80lZ
Okay, this is really cool (except for the fact that it uses XML, which is the bane of my existence) and before exploring the next request, I think I’ll need to see where in the client-side code this request is formed, because I need to understand how all of these values originate.
Examining main.js and libjquery.js Link to heading
The main.js file is quite large, at more than 10k lines. I was expecting that, as this is such a simple device, the implementation must be very rudimentary, avoiding as much as possible using external libraries which can bring overhead. Because of that, these files contains almost all that is necessary to run the entire page.
Also, because of this, we can overlook various functions as they are just standard implementations of tools for hashing, encoding, handling objects in the page, and other common utilities. I have to give some props to whomever wrote this, as the variables and function names are very descriptive, and that makes finding things very easy.
The first function that obviously jumped out as relevant was the one called login(). I won’t post the code here, as it is quite large, but you can check it out here. Basically, what it does that’s relevant to us is:
- First, it calls
refreshToken(). Looking at this function, we can see that it just requests a value from the server, and splices the last 32 characters and saves them in an array. - Creates a
CryptoJS.SCRAM()object, and uses it to create a nonce. - Then it constructs a request like we already saw, with username, nonce and mode, and sends it to
api/user/challenge_login. - If the request is successful, it uses CryptoJS again for calculating a salt and the salted password with the number of iterations it received.
- Stores the received nonce and concatenates it with the nonce it generated before.
- With all of this, it creates a client proof.
- Finally, it constructs a new post request payload with the client proof and the nonce it received, and sends it to
api/user/authentication_login.
I guess now is time to see that request when it was captured by OWASP ZAP.
POST http://192.168.1.1/api/user/authentication_login HTTP/1.1
...
_ResponseSource: Broswer
__RequestVerificationToken: Eh0vOHeaPiaTj1EFqfT5h4Rvb0CHGrdK
...
Cookie: SessionID=VZQfWUNzvZYmgTLYmgiXkH5jh1O3G00WNGIqqVbj9tE7AdhAMIdsWyRyJkRn4FiHOKnt80KuXYrGMmMPOZpO3iRWoODm6U0v4My9jK8jIL0gPqyYWBppqZV40F5zzL4P

<?xml version="1.0" encoding="UTF-8"?><request><clientproof>ace649ff8cdfca5d8803a1ef6d4a4a38255755057bda23c4ba6aa32e78690485</clientproof><finalnonce>d2ea0f0fca5ba0fbd4e96e4c93da2e129da694f29803fed368eee9713ecc2093W0Mcj1iQjt8jBtt3tjFXkMcYhT0vEOaZ</finalnonce></request>
The response to the successful authentication, though, it is huge, tons of content in the header and on the response itself.
HTTP/1.1 200 OK
Set-Cookie: SessionID=i0z0A00lloIR6sqTjmQcIHe6dANfqv1tbJgyjZf6EYopGX5139gFZ17cDefX0nrOAG5hOQwYQ23xdfKGxmwWQf1iSFlhVGqV73NVaXIL76MktGFcT13XKuMhu8ZVhqQD; path=/; HttpOnly;
__RequestVerificationTokenone: svFEjAj11OKmlReCtsV3LiurlPk8arIb
__RequestVerificationTokentwo: fpvtaWYoFyXvo1OXAohYda75hX0IY7U1
__RequestVerificationToken: svFEjAj11OKmlReCtsV3LiurlPk8arIb#fpvtaWYoFyXvo1OXAohYda75hX0IY7U1#U931TM9HGqz1oEoZ1YPcBI4rAK2VKUyX#KT0Pb7nqEzpiHMJuGzOgRr3r6yh32DiD#n0lBzgR2pIjrHOEiXuz0FDu96EvHNpX0#EnyG0Jo6iMdHVUe6vUIiE4MyH0Kn4EFN#PsE4UCBRZBMYtFbupenp8qsvKwrF25ee#bOOaBhQ03oWIQBWaS4CglIOZRjQmVJjH#3YuUlPNofPq0v9acfiDuQZHakpOu93lq#wsXiOtqrcPNKXpzeiuiH2J9sO05b5l98#AkC9SFgh2NRjuL03s7TZSQFVFfLpvOma#jHGwNLXfotwvBcuD3MMU8Hd0kVCaKxAS#fF0X0Kobzvjrz4q3ur51Mbjj7ob91tqX#qeW8AQiiaM517lr8mdrBuo0XMIFYRSZ7#7tvf6QY9Sp0ywmjy6shM4EJCpZL0E0t2#kZ1x1R3oKoOQY7KvKMq98uDy1wMuQ4zR#7suQ10t2k4lu0aAtwjshIDly9DIn6HVO#yscXqZqW0Pk0CIqv2QYuHDMFKDqgqkzR#lduvy2L1HFgMj4NKJVgSfvLDv1y0RgD2#UeH9ogaHVtw0mRvSQqlPd5jrRUCOPK64#uDkvta0OZIB80xT30x0a0XE3S2Q68r7Z#jkysLDgepVjcPR8jBFPhsaPfumeX03hk#BcNcgq39k4PFgHqvn3IJVjx02oqNkUVM#Lk5475hz3SbRGVKJIxgJX44ZYHt45fBC#T660js8hu5D0KV8vVdEVEXwfvkmJPYr6#Ub3QIFGzojwOxl40Pq0UIGx40cx5s078#nEfvlZIv0UphEsrcJ5AbD0QeYVnsQ1z4#vEgBOpFz2LRn9eqrZ9OVNdc0eC4Lo992#96RHfcHJYhmzBnM9LYmxD766gU4zcFqB#8VtDz1ewLLva5Y6OTfazOj044lcWEbCL#p0SKFICe5waVifowMKV0aKFO4N2cBkYG#8TZBe0g02f5PAKTDZ5qR3asCQEZjd8lR
Content-Length: 807

<?xml version="1.0" encoding="UTF-8"?><response><rsan>c375131fe95fb28f76b5963efb7d7fbf5873d37fcc9c7a5a04681868192ce20bdd863c6c79d21f54666053e2e13e610df78499de15ed0308349f373387df7cc0914c56e080674165a0279432ce697489392c27d7bef7a8e1c7d86276c86ada912f6e9b862732c61194c14e05873535b32dea7e72c56254ca99e63a940c4738c5f49e67745a890d0f2fba3574be35519a5e12dbf7b3434bec2dec7ec88113435ee01a2a51e6824e9f2d4ab160d0e0b3481d963ba1aea9374c7a00f80bcdf43abce979e1acef56def3d5e99c89c5a24294236280a1116b50875d9e6453bc1e244299335713435dffce1efda59b2a4bb768a1da7d6087abc32cbd1148b18c942293</rsan><rsae>010001</rsae><serversignature>496eccbbe127b1ba31161ab8f6a1e7cfc28ef431b9b8b2aecc1eb962fc7c54e1</serversignature><rsapubkeysignature>0e01d0cd60984c28f9c9596293b9709e5b3f2c454bb9c54e01dd46d8ef1983ca</rsapubkeysignature></response>
Once this is received, there is not much to it really. It will calculate the server proof and compare it with the server signature it received. If it matches up, then it calculates a server key, and with it a public key signature, and also compares it to the RSA public key signature it received. If everything matches, it ensures mutual authentication.
Now, what also must be noticed, is that all of these calculations rely on the CryptoJS.SCRAM() object functions, so we need to review them. These are located in another file called libjquery.js.
(function () {
    ...

    var SHA2 = C_algo.SHA256;
    var HmacSHA2 = C.HmacSHA256;
    var Base = C_lib.Base;

    var SCRAM = (C_algo.SCRAM = Base.extend({
        ...
        nonce: function () {
            lastNonce = WordArray.random(this.cfg.keySize * 4);
            return lastNonce;
        },
        saltedPassword: function (password, salt, iterations) {
            return CryptoJS.PBKDF2(password, salt, {
                keySize: this.cfg.keySize,
                iterations: iterations,
                hasher: this.cfg.hasher,
            });
        },
        clientKey: function (saltPwd) {
            return this.cfg.hmac(saltPwd, "Client Key");
        },
        serverKey: function (saltPwd) {
            return this.cfg.hmac(saltPwd, "Server Key");
        },
        storedKey: function (clientKey) {
            var hasher = this.cfg.hasher.create();
            hasher.update(clientKey);

            return hasher.finalize();
        },
        signature: function (storedKey, authMessage) {
            return this.cfg.hmac(storedKey, authMessage);
        },
        clientProof: function (password, salt, iterations, authMessage) {
            var spwd = this.saltedPassword(password, salt, iterations);
            var ckey = this.clientKey(spwd);
            var skey = this.storedKey(ckey);
            var csig = this.signature(skey, authMessage);

            for (var i = 0; i < ckey.sigBytes / 4; i += 1) {
                ckey.words[i] = ckey.words[i] ^ csig.words[i];
            }
            return ckey.toString();
        },
        serverProof: function (password, salt, iterations, authMessage) {
            var spwd = this.saltedPassword(password, salt, iterations);
            var skey = this.serverKey(spwd);
            var sig = this.signature(skey, authMessage);
            return sig.toString();
        },
    }));
    ...
})();
Okay, this is important because we can see how every function operates, and we will need this information when we try to replicate it.
The only thing missing from all of what we’ve seen is knowing where those header flags with weird values are!
Within this login() function, however, there is nothing regarding headers apart from the variable g_requestVerificationToken being verified. But what is also obvious is that I don’t see any AJAX calls directly here; all I see are these saveAjaxData and getAjaxData functions. Let’s go see how they are creating the requests.
function saveAjaxData(urlstr, xmlDate, callback_func, options) {
    var myurl = AJAX_HEADER + urlstr + AJAX_TAIL;
    var isAsync = true;
    var nTimeout = AJAX_TIMEOUT;
    var errorCallback = null;
    var headers = {
        _ResponseSource: "Broswer",
    };
    if ($.isArray(g_requestVerificationToken)) {
        if (g_requestVerificationToken.length > 0) {
            headers["__RequestVerificationToken"] =
                g_requestVerificationToken[0];
            g_requestVerificationToken.splice(0, 1);
        } else {
            setTimeout(function () {
                saveAjaxData(urlstr, xmlDate, callback_func, options);
            }, 50);
            return;
        }
    } else {
        headers["__RequestVerificationToken"] = g_requestVerificationToken;
    }
    if (options) {...}
    $.ajax({
        async: isAsync,
        headers: headers,
        type: "POST",
        timeout: nTimeout,
        url: myurl,
        data: xmlDate,
        error: function (XMLHttpRequest, textStatus) {...},
        success: function (data) {...},
        complete: function (XMLHttpRequest, textStatus) {
            var headers = XMLHttpRequest.getAllResponseHeaders();
            if (headers.indexOf("__RequestVerificationTokenone") >= 0) {
                g_requestVerificationToken.push(
                    getTokenFromHeader(headers, "__RequestVerificationTokenone")
                );
                if (headers.indexOf("__RequestVerificationTokentwo") >= 0) {
                    g_requestVerificationToken.push(
                        getTokenFromHeader(
                            headers,
                            "__RequestVerificationTokentwo"
                        )
                    );
                }
            } else if (headers.indexOf("__requestverificationtokenone") >= 0) {
                g_requestVerificationToken.push(
                    getTokenFromHeader(headers, "__requestverificationtokenone")
                );
                if (headers.indexOf("__requestverificationtokentwo") >= 0) {
                    g_requestVerificationToken.push(
                        getTokenFromHeader(
                            headers,
                            "__requestverificationtokentwo"
                        )
                    );
                }
            } else if (headers.indexOf("__RequestVerificationToken") >= 0) {
                g_requestVerificationToken.push(
                    getTokenFromHeader(headers, "__RequestVerificationToken")
                );
            } else if (headers.indexOf("__requestverificationtoken") >= 0) {
                g_requestVerificationToken.push(
                    getTokenFromHeader(headers, "__requestverificationtoken")
                );
            }
        },
    });
}
We can see that saveAjaxData() is just a method for constructing POST requests, and already we can see the header flags that we were missing! It’s not overly complicated, really, and we learn that for a POST request to be valid, it must contain a verification token. Also, these verification tokens are stored in an array and apparently are issued by the server for the client to use. If you recall the last response we got from ZAP, those were issued in the header.
Finally, the cookie flag: we don’t really need to see how the code handles it because, from the capture, the operation is pretty straightforward. For any GET request, the cookie is not necessary, but the server in the response will return a Set-Cookie flag, so all we’ll need to do is update our cookie every time that header appears.
Developing a solution Link to heading
Lets get into development!
Now look, I can’t be acused of prefering Python for every thing like a sucker, but I do belive in choosing the best tool for the job. Is this a super specific task? Will it be efficiency constrained? No and no. Do I want to get this over with? YES!
So we’ve poked and prodded, and now we know how this router’s brain (or lack thereof) works. The goal? To programmatically log in and tell it to behave, specifically when it comes to those pesky port-forwarding rules. Since we’re dealing with a custom CHAP authentication and XML (ugh).
Here’s the high-level battle plan for our login script, inspired directly by the JavaScript we just dissected:
Get a Fresh Token: Remember that
__RequestVerificationTokenand theSessionIDcookie? Yeah, those are crucial. Our first step is to hit the/api/webserver/tokenendpoint to grab a fresh token and cookie. This is handled by ourrefresh_token()function in Python. No token, no entry!Send the Challenge: Next up, we initiate the CHAP dance by sending a POST request to
/api/user/challenge_login. We’ll include our username and a randomly generated “first nonce” (a unique, single-use number). The router will respond with its own “server nonce,” a “salt,” and the number of “iterations” needed for the password hashing. Oursend_challenge()function takes care of this.Calculate the Proofs: This is where the real cryptographic fun begins! Using the password, the salt, and the iterations received from the router, we’ll calculate a “salted password.” Then, we use this salted password, along with an “authentication message” (a string combining our nonces), to compute both the “client proof” and the “server proof.” This is a direct translation of those
CryptoJS.SCRAM()functions into Python’shmacandhashlibmodules.Send the Response: With our shiny new “client proof” in hand, we send it back to the router via a POST request to
/api/user/authentication_login. We also include the “final nonce” (which is actually a concatenation of our first nonce and the server’s nonce). This is done by oursend_response()function.Verify, Verify, Verify: The router will send back its own server signature and an RSA public key signature. To ensure we’re talking to the right guy (and not some imposter!), we’ll calculate our own version of the server proof and the RSA public key signature. If our calculations match what the router sent, then boom! Mutual authentication achieved. We’re in! This final verification step is crucial for security.
So, while the router might be a bit of a pain with its random resets and XML preferences, we now have a solid understanding of its quirky login process. The controller.py script essentially mimics the browser’s behavior, step-by-step, to gain control. No more begging the ISP for help or pulling out our hair when the VPN won’t connect!
Setting and forgetting Link to heading
Now that we’ve got this fancy Python script that can log into the router and boss it around, what’s the ultimate goal? Automation, of course! My personal solution to this ongoing router rebellion was to set up a trusty cron job on my home server.
Every ten minutes, like clockwork, this script springs into action. It first checks if my crucial Wireguard port-forwarding rule is still alive and kicking. If, for some annoying reason, my ISP’s router has decided to throw a tantrum and erase the rule again (which, let’s be honest, it probably has), the script simply logs back in and re-creates it. Problem solved!
This means I no longer have to worry about my VPN suddenly dropping out when I’m trying to access my server from work or school. It’s truly a “set it and forget it” solution, and my blood pressure has thanked me for it.
Take that, rogue router restarts!